Monday, February 26, 2018

Finished Pink Squares for the "Tat a Monument in Pink" Project

I have not forgotten that I have a blog, though it may appear so.  Finding time for working on this blog in the midst of a busy schedule is where I have failed.

I regularly write and send out the newsletter for my local Fiber Guild.  That goes out twice a month, a few days before our meetings.  I also take care of emails and the Member Contact list for the guild.

I tat, craft, and occasionally think to myself, "This would be good for the blog."  So there are a number of photos and subjects waiting...

A few weeks ago, I heard about an international project to decorate a Brussels monument with pink tatted squares to bring attention to tatting lace as an art and women's rights all over the world.  It is being organized by Cathy De Greef (Canarithy) to coincide with the World Lace Congress in Brugge in August 2018.  You can read more about it on her website and on Facebook.

I was glad to get my squares finished and mailed off last week!


Patterns Used: 
Square by Cathy De Greef (Canarithy), Posted on her Website and on Facebook
Alternative Brussels Square by Jane McLellan, Posted on her Blog
Another Square by Carollyn Brown, Posted on her Blog
Weldon's Square Medallion, Posted by Milly Suazo on Facebook


Threads Used: 
Lizbeth #20-621 (Dusty Rose Lt.)
Lizbeth #20-145 (Pink Parade)
Lizbeth #20-620 (Azalea Med.)
Lizbeth #20-176 (Pink Blossoms)
Lizbeth #20-700 (English Rose Med.)
HDT by Marilee Rockley, Yarnplayer, Size 20 (Raspberry Sorbet)

Clover Shuttles and
Custom shuttles by Rita at Shuttle By Design 


Wednesday, January 25, 2017

Painted Quilts and TIAS 2017, Days 4-5


At the January 2017 meeting of the West Alabama Quilters Guild, Dr. Bethany Windham Engle spoke to us about her quilt-inspired paintings.  She brought two of her paintings for us to see.

From a distance, they look like they are made with fabric, much like a traditional quilt.  Up close, it is easy to see that they are in fact painted.  Dr. Engle used acrylic paints to mimic fabrics and pencil drawing for the portrait.

Thanks for sharing your artwork with us, Dr. Engle!


Here is my progress with Jane Eborall's TIAS 2017.  The instructions for Day 4 called for zig zag chains.  I tatted a lock stitch chain first, then realized my mistake when it didn't look quite like the diagram.

I printed Jane's technique pages on Lock Chain and Zig Zag Chains and made samples before continuing with the TIAS.  It was a good challenge. :)


Day 5 was a row of split rings.  Much easier!


'Til next time,
Christine

Sunday, January 22, 2017

Kirigami and TIAS 2017, Days 1-3

Happy New Year!  I have lots of things to share with you, and I will start with two ongoing projects.

At the beginning of this year, I purchased a page-a-day style calendar of Kirigami designs.

I have enjoyed folding and cutting out the various motifs.  Below are a few that I have made so far.  I hope to have many other pretty Kirigami as the year goes on. :)


I have also started tatting Jane Eborall's "Tat It and See" project for this year.  The length of the project and the outcome are both a mystery!

Part of the fun is learning new techniques and another part is trying to guess what we are tatting.


On Day 1, it honestly could have been anything!


On Day 2, I thought perhaps it was the beginning of a snowflake.


On Day 3, I was thinking that it is the start of a very fine vase.
(The painting is Flowers in a Vase by Odilon Redon.)

But my husband says it is the Taj Mahal!

'Til next time,
Christine

Tuesday, November 8, 2016

Election Day Tatting


My husband and I stood in line for about an hour this morning so that we could vote.
I made good use of my time. :)


Tuesday, September 6, 2016

Travel Tip: Konmari-style Packing

Over the years, I have tried several different ways of packing clothing for travel and even done some research online into recommended methods.  After learning how to tidy my house from Marie Kondo's books, I decided to try her folding and vertical stacking method for clothing in a suitcase.

So far, this is the best method that I have found.  It doesn't eliminate wrinkles entirely, but wrinkles are minimized.  Clothes are easily organized this way, and it is very easy to find anything I need while travelling.  The photo below shows pants, jeans, shirts, and pajamas folded and vertically stacked.  A few more items will fit on top.  When I get to my destination, I can easily pull out the items I need without disturbing all the others.

Here are links to Marie Kondo showing her folding method for Tops, camisoles, and socks; Odd-shaped clothing; and T-shirts (YouTube videos).

Konmari-style Packing


Another Yay! for tidying. :)


Monday, September 5, 2016

Tatting Thread Color Samples

I like to have color samples of my tatting threads to help me choose threads for future projects.  I decided to use a rings-only edging pattern for the samples, as it shows the colors the way they come off the ball of thread.  A motif of rings and chains tends to chop up the colors.

I found this pattern on a Russian website through Pinterest.

Here's my version:
R: 2 ± 7 - 2 - 7. RW.  Leave unworked thread space of 3-4 mm.

Repeat R for desired length, joining Ring 3 to Ring 1 and Ring 4 to Ring 2, etc.


When I tat this with Lizbeth size 20, one sample uses about 3 yards 6" of thread.


Sunday, September 4, 2016

Quilt Shop Billboard

We saw this billboard recently when travelling on the highway south of Atlanta.  I can't say that I have ever seen a Quilt Shop billboard before.  Too bad we didn't have time to stop!


Exit 221 - Quilt Shop

Edited to add:
I just realized that this would have been much more curious if it was at Exit 221B. :)

Saturday, September 3, 2016

Sewing Room 2.0, The Closet

The tidying that I mentioned in my last post included this closet, which is attached to my sewing room.  It holds quilt fabrics; bins of interfacing, buttons, zippers, etc.; some paper crafting supplies; and now my wall of yarn.

Alchemy Stitchery: Sewing Room 2.0, The Closet
View from the doorway

The wall of yarn (with some bins of UFOs and quilt fabrics on the left)

Supplies for paper crafting and other things

Again, I don't have "before" pictures to show you, but I promise that it is much more organized than before and the bins are more accessible.  Yay for tidying! :)

Friday, September 2, 2016

Sewing Room 2.0, New and Improved

I didn't mean to neglect this blog for so long.  Sorry about that!

In the meantime, I have been taking pictures of interesting fiber-related things and thinking, "I could post this on my blog!"  So there are a handful of things waiting to be shared with you.

My latest news is that I have spent much of the last three weeks tidying and I am eager to share what feels like a new space, my sewing room.  The tidying began with my bedroom closet, involved the office and part of the dining room.  I was able to clear off a bookcase that had been in the dining room and my husband helped me move it into the sewing room.  That gave me a lot of space for magazines, books, and binders, which had been on my metal shelf units.  That freed up space on the metal shelves, which are deeper than the bookcase, for fabric, storage bins, and what-not. 

I didn't take "before" pictures, but I think you can imagine a sewing room that was rather higgle-piggle, with stuff stacked up on every available surface and storage bins and what-not on the floor, so that there was a narrow path through the room.  Also, the cutting table was piled up with stacks of fabric, works in progress, UFOs, papers, and other tidbits.  The long side table was nearly covered with bits of this-and-that, more fabric, a half-finished shawl, knitting tools, etc.  The day bed had become home to tote bags, more UFOs, samples of free-motion machine quilting, and the dies for my Accuquilt fabric die cutter.  The floor of the sewing room closet was piled up with things to where it was hard to get to the storage bins there.  Plus, there was dust!  Not a good work environment.

I admit that I have been reading Marie Kondo's book Spark Joy, and it has been the inspiration and guide for all of this tidying.  I have not followed her system exactly, as I have been tidying mainly by location instead of category.  I consider this a first pass at tidying -- putting similar things together, finding a few to throw out or give away, and cleaning as I go.  Before, my yarn was stored in bins located all over the sewing room.  Now most of it is on one wall in the closet, with a few bins under the table in the sewing room.  All of the sewing and crafting tools that I came across in my tidying are in one location.  It's much better. :)


View from the doorway
The long side table


The cutting table


The design wall and ironing board in place

I hope to do more tidying in the future, as there is much more to be done, but I must stop for now as there are other things that need my attention. 


Tuesday, March 1, 2016

When I First Learned to Tat

I intend to write a few posts to chronicle some of my past tatting projects.  I hope you won't be bored!

I first learned to tat in 1995.  Below is the box of tatting supplies that I have from that time.  One thing I liked about tatting is that the needed supplies were small and easy to travel with.


Below is the box of tatting that I made in 1995 and 1996.  I had a Coats & Clarks book or two -- not many patterns.  I had four metal shuttles -- one Boye, one Susan Bates, one Justrite, and one without any markings at all.  The Justright shuttle is interesting in that it is a post shuttle and it twists apart so that thread can be wound around the post.  The other three use bobbins.


You may notice dark spots on some of the tatted motifs.  I didn't have the benefit of the fabulous tatting community that exists on the internet today.  Resources and information about tatting were hard to come by.  So I was stumped as to how to handle the thread ends.  

My solution was to knot the ends (probably a square knot) and then dab the knot with Fray Check.  Over time, the Fray Check has yellowed and darkened.

Please learn from my mistake!  My advice is to be very careful about anything that you apply to your tatting, or other creations.  Be sure the product is acid-free and archivally safe.


I enjoyed making these little squares. I made a number of them with J&P Coats Tatting-Crochet thread, color 13-C, which I believe is size 80. But I observed that each one was just under 3/4" square, and it took me about 45 minutes to make.  After awhile, I wanted to make something that progressed more quickly.  

Also, I didn't know what to do with my little squares.  I didn't feel the need for doilies... I thought the squares would be nice sewn onto something, such as a white linen blouse.  But thinking about it was as far as I got.

My tatting was set aside for other crafts.  

(To be continued...)

Sunday, February 28, 2016

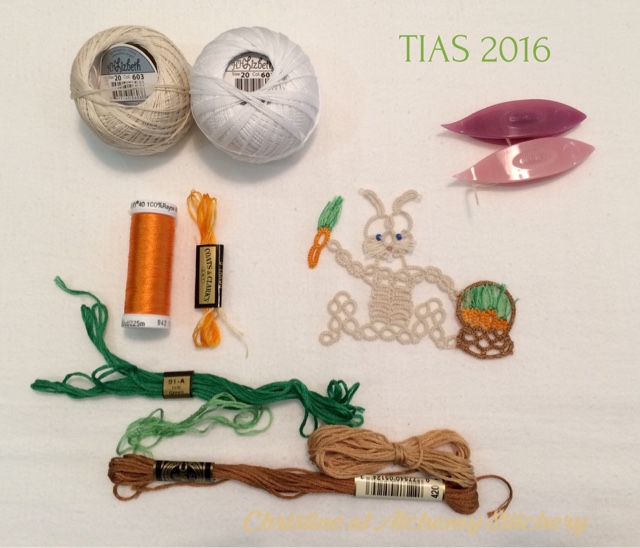
Completed TIAS 2016

Here is my completed TIAS 2016.  Thanks to Jane for the fun project!

Threads I used:
Rabbit - Lizbeth #20-603, Ecru
Teeth - Lizbeth #20-601, White
Carrots - 3 strands variegated embroidery floss (yellow to orange) with one strand Sulky #40 Rayon, #1065 (orange)
Carrot tops - 2 strands light green embroidery floss with one strand of floss, #91-A, Isle Green


I was inspired by the picture of Brenda's flower basket on Day 11 to make a basket of carrots for my rabbit.  
This way he won't go hungry!

Basket thread - 2 strands DMC embroidery floss #420 (med. brown) with one strand tan floss

I hope to take part in next year's TIAS.  I know it will be another fun bit of tatting. :)


TIAS 2016 - Threads Used

Welcome to my new blog!

My intent here is to share with you some of the projects I have been working on, interesting things I have learned, and whatever else strikes my fancy.

The end of 2015 was very busy for me -- November and December in particular -- with traveling, holiday activities, etc.  There were lots of things I needed to do for other people and less time for myself than I am used to.  In addition, I had strayed from my diet somewhat and I was starting to feel run down, fatigued, and quite crummy.

So I knew that the beginning of this year would be for resting.  I have spent much of my free time sitting very still -- sometimes that meant staring out the window, reading, or - quite frequently - tatting.  I have also spent a good amount of time cooking, exercising, and looking after myself.  It has paid off and I am feeling much better than I did at the end of December.  It is amazing how much a difference it makes to eat the right foods!

Perhaps I will ramble on more about my diet later -- it is very important to me, but it is not the focus of this blog.  Here I wish to focus on my "Stitchery" projects, which are primarily sewing, quilting, knitting, or tatting.  I am a member of both my local Quilt and Fiber guilds.  I enjoy attending classes and workshops from time to time and learning new things.

Most of my knitting projects are documented on Ravelry, which is a fantastic resource/website, but I have been wanting a way to share other projects I have been working on as well.  Thus this blog!